Showing posts with label tutorial. Show all posts

Tuesday, July 16, 2013

homemade laundry detergent because i'm granola like that

hi y'all! 
hope you had a great weekend. 
i sure the heck did. :)

okay, so i promised you deets on my homemade laundry detergent. 
here's the story morning glory....

i have been wanting to make my own laundry soap for like, ever.
i kept procrastinating because i am such a researcher and wanted to sit down and research all the different options and pick the best/right one. 
welp. i got waylayed by the end cap display at walmart.
it was a big tower o' borax calling my name. 
i'm such a sucker for marketing. 

anywho, i just decided to look up a recipe right there in the walmart aisle and buy whatever it said.
i'm so spontaneous. 


i knew i wanted powder so i just clicked on the first pretty picture of powder detergent i saw and went with that. :)
the stuff sat on the counter for a few days until i could get to it. 
in the meantime, i did sit down and research several recipes online.
i chose powder b/c it seems like less mess and less storage and i like the way it looks in a jar. :)

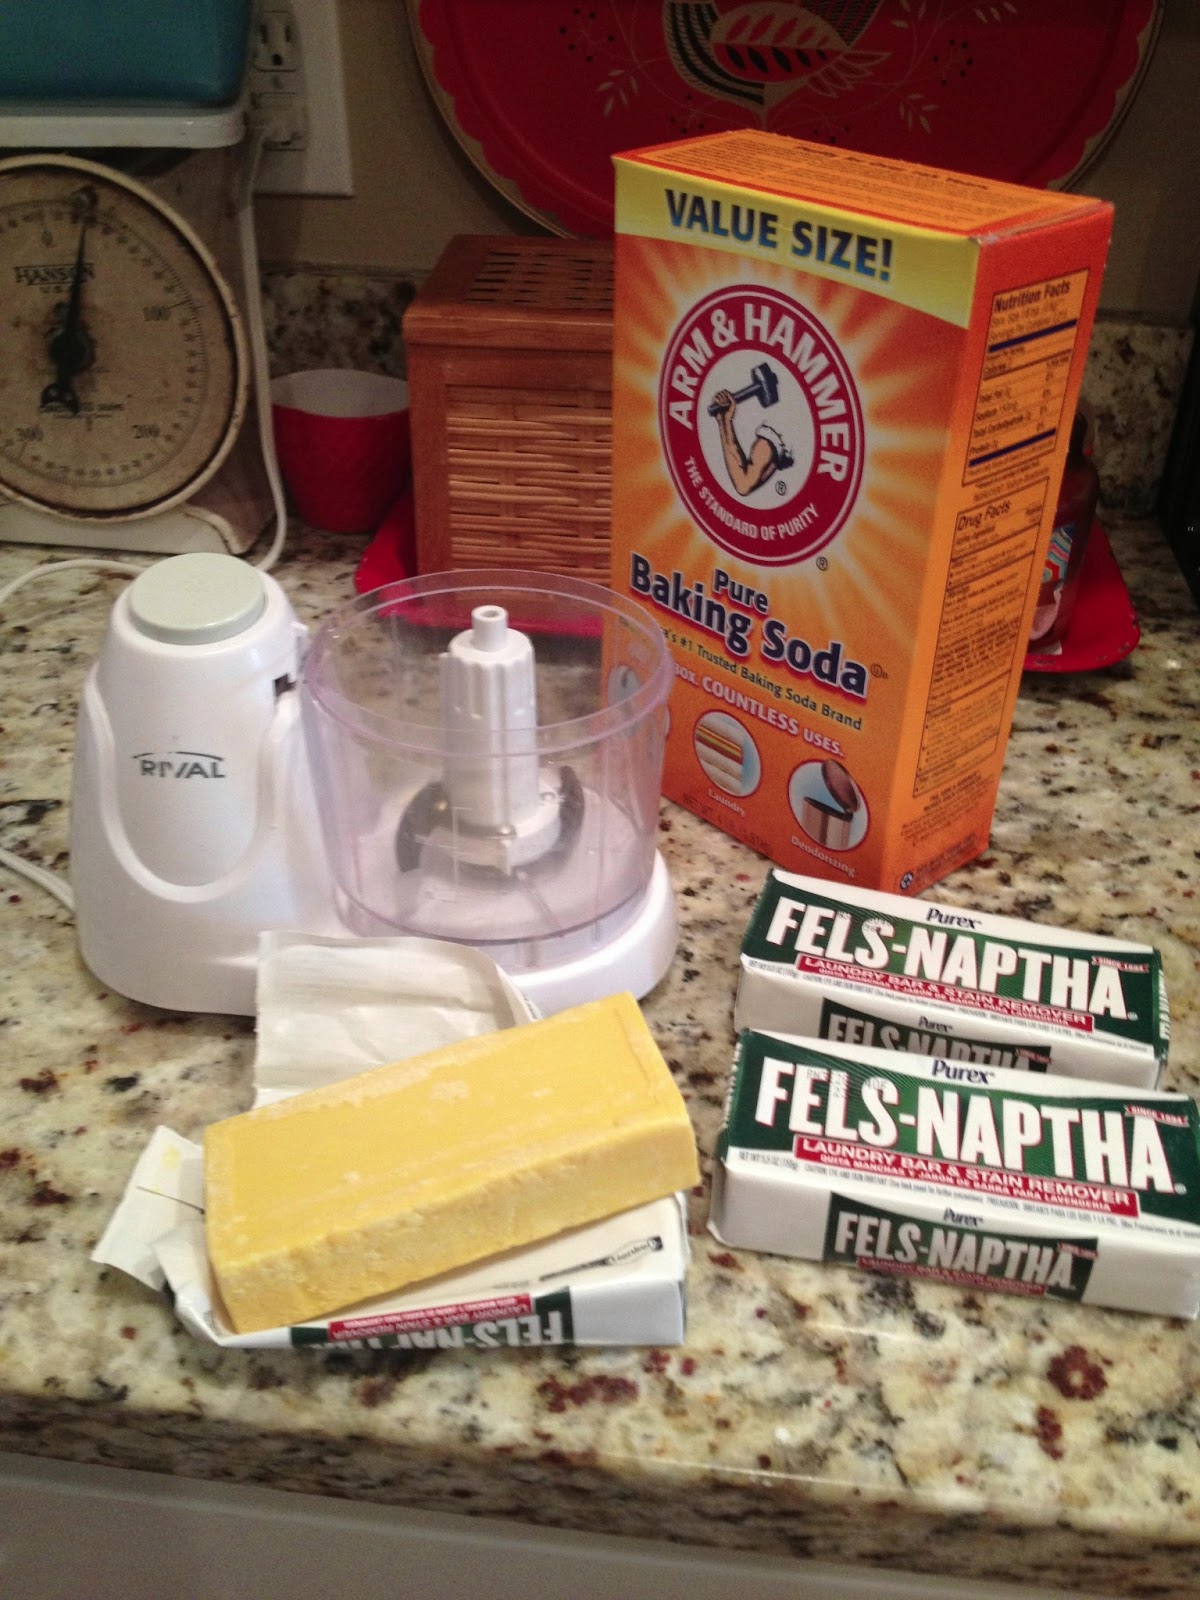
the recipe i landed on uses all of the ingredients in the pic above.
i did see many recipes that just used borax, bar soap, &; washing soda.
i may try that next time....we'll see how this works out. 
i also saw several recipes with different soaps like zote, ivory, etc.
so you can play around with that part. 
i will probably try zote out next time....which is hopefully a long time from now. :)

there are a bazillion tutuorials for homemade laundry detergent out there but if you want to try what i did, i used: 

76 oz. box borax
55 oz. box washing soda
4 lb. box baking soda {on the laundry aisle}
3 bars fels naptha
1.5 {ish} pounds oxi clean (i used about 1/2 of that 3 lb. tub)


i grated the bars of soap on the finest part of my cheese grater.
this was totally mindless and easy.
i did it while watching dumb television. ;)
maybe not the best use of my brain cells, but oh well.
i wanted it super fine so i put the shreds through my mini chopper.
{this is what i use to chop all onions with and it saves my sanity}.
you don't have to do this step, but i am particular like that. :)
i found that some people just did the grating and some people just put it through their food processor.
whatever you have will be fine, i'm sure....i just wanted it to be nice and fine.


also, every time i put some of the shredded bar soap into my chopper i added a spoon or two of baking soda to keep it from clumping up in there. this worked like a charm.


so this is how it looks all shredded and processed.
i poured the rest of the big box of baking soda into this bowl and mixed that all up.

to mix the whole batch up, i poured this and everything else into a clean kitchen trash bag.
i actually double bagged it just to be safe.
i used a wooden spoon to stir it all up and then i pulled it out of the trash can and rolled it around and mushed it to get it all mixed up.


it honestly was super easy and you only use 1-2 Tbs. per load so it should last me for a while.
which i need since there are six of us crazies in this house. :)


let me know if you try it or if you already do this and have some tips for the rest of us! :)


feel free to pin and share! :)


Pin It

Monday, October 22, 2012

running tips from a non-athlete


several people have asked me how i got started running, so i thought i'd give my two cents and some tips.

do you think running looks like torture?
do you dry heave and have severe side pains when you try to run?
do you have no time to run?
do you have no motivation to run?
are you uncoordinated and generally un-athletic?

perfect. 
you are my people. 
these tips are for you.  :)

okay so i never intended to be a runner and honestly i am pretty much a fair weather friend of running. 
i am going to try my darndest to stick with it over the winter months {i'll keep you updated on that.}
thank goodness for the treadmill.  

running never appealed to me because:
1. it just wasn't on my radar
2. whenever i'd see people running they didn't look like they were particularly enjoying themselves.

welp...i married a runner.
only, he wasn't a runner when we got married but he is a natural athlete.
he's always been involved in sports so anything athletic comes pretty easily to him.
again, the opposite of me. 

five or six years ago he started running and has run his fair share of half marathons.
he loves it.
he's diligent. 
he reads runner's world for fun.

little by little he chipped away at me {in a very non-pressury way} and started convincing me that i could run and enjoy it. 
i started running a few years ago and have been pretty off and on with it . . . due largely in part to the fact that i got pregnant and had a baby and see that as 100% excuse to do nothing athletic of any kind for 2 years. 
can i get a witness?

this summer i started running again and am actually {cue the angel chorus} enjoying it. 
so here are my tips for all you, that-looks-like-zero-fun-but-i-really-need-to-get-in-shape, people like me: 

Tip #1:  in the words of nike, just do it. 
seriously. 
put on your running shoes. 
put on some sort of running clothes or pajamas or whatever and go run.
put one foot in front of the other and just make yourself do it.
even if you are so sloooowww.
you will at least feel the sense of accomplishment of running.
some people find it helps to run for two minutes, walk one, run two, etc. 
for me, i do better if i don't stop running until i'm done.
either way, just get out there and run. 
anyone can run, it takes no special skills.
it does take decent knees so if your knees are crap, you may want to try biking. just a thought.

Tip #2: set small goals.
start with half a mile.
then aim for one mile, non-stop running.
then one and half, then two.
if you can work your way up to three, you're ready for a 5K. 
how cool is that?!

Tip #3: run outside if at all possible. 
sometimes, logistically i have to run on our treadmill in the garage.
and it is hard.
but i do it because i want to stay in shape and not lose momentum.
and i have to push with every ounce of my perseverance to run one mile.
when i run outside, i can run three miles and actually enjoy it.
i can distract myself with looking at houses, trees, the sunrise, the beautiful sky, etc.
i get up early and run before AJ leaves for work. 
it's darkish still so i carry pepper spray and my phone.
but the breeze on my face and fresh air feel so good and make it so much easier.

Tip #4: have lots of kids so that you never get alone time and therefore crave every minute of peace and quiet you can get. :)

Tip #5: get a cheerleader or two.
this is a huge one.
for me, it's AJ.
he's my biggest fan and he supports me like crazy. 
he helps me get up in the morning and helps me make a plan for how far and where i'm going to run.
another option: get running partners.
this would be highly motivational and keep you accountable. 
i know many people who credit their running to having running buddies.
i have a crazy schedule & no running friends close, so i run alone, but you may have friends who are available and want to run with you...take advantage of that!

Tip #6: make a plan
halhigdon.com is a great site to customize a running plan for your personal goals.
it's great for people like me who have no idea what they're doing. 
thumbs up, hal higdon. i'm a fan.
also figure out what days of the week you can run and try to stick with that and have your people {running partners or personal cheerleader} keep you accountable. 
if you miss a day, figure out a way to make up for it so that you don't lose momentum. 
ideally i would run 3-4 times a week.
right now, i run twice a week and that works for me.
eventually i'd like to run more, but you know, i've got little ones so i'm giving myself some grace.

Tip #7: sign up for a race
this is huge.
you have a goal.
you want to be ready for that race so you don't look like an idiot in front of your friends.
sign up for the race. pay the race fee. 
get a plan for that race {again halhigdon.com is a good resource or just google running plans} and do what the plan says so that you can work up to it.
a race is so fun that you will want to do another one. 
there's so much adrenaline and sense of accomplishment. 
seriously this is my most important tip.
sign. up. for. a. race.

Tip #8: see results.
okay so this comes once you actually start running but this is a huge motivator for me to keep at it.
two major results for me, i'm in better shape and i've lost weight.
being in better shape = i can run farther and longer and feel good doing it. 
that's huge motivation to not stop because i don't want to lose that stamina.
and obviously, losing those stubborn pounds that wanted to hang on for dear life after having four babies is motivation like crazy.
i'd rather not get those bad boys back thankyouverymuch.
my clothes fit better and obviously i feel better about myself.
{in an effort of full disclosure i would also like to say that i quit eating like i was pregnant or nursing so that probably helped too. ;)}


okay peeps, i've shared my pearls of running wisdom.
do y'all have anything to add? any running tips to share? any questions?
let's discuss in the comments.....


Pin It

Tuesday, July 3, 2012

freezer jam


do you guys make this?
AJ loves his mom's jelly.
she serves it at every meal . . . with fresh homemade bread.
yes, she is amazing.
she makes all different flavors.
lots of strawberry but she does peach and apricot and whatever else she has on hand as well.

it's not hard to make....honestly i just forget.
it's not on my radar.
sorry, honey.
after spending the better part of a week at AJ's parents, {you know when he was in the hospital?} i was reminded how great her jelly is.
and she reminded me how easy it is.
like seriously.


you buy a box of sure jell and a quart of strawberries and follow the directions on the box.
it makes five jars.
it's a good value. :)

you basically just smash up the strawberries....


add a whole bunch of sugar . . . 
don't worry about it....it's going over five jars, remember?


cook the sure jell with water and then mix it up with the strawberries and sugar......


dig around your cabinets and find whatever jars you can find.
i had some leftover canning jars and a cleaned out pesto jar.
you don't have to know how to can or anything like that.
you just pour the jelly in the jar and twist the lid on.
the end and amen.


you can keep it in the fridge for three weeks or in the freezer for a year.
it won't last that long, i can promise you that.

it's so yum. way better than store bought.
:)


happy day, friends! have a happy fourth! 


Pin It

Thursday, April 26, 2012

adventures in spray painting


it's official.
there's a new love in my life.
i broke up with krylon and have now fallen head over heals for valspar.

i have been using krylon for years because it was at wal-mart {convenient since i'm shopping there anyway} and a good price.
well, i have switched and i won't be going back.

this valspar is soooo much better.
it's way less drippy and took less coats for really good coverage.
i'm a fan.
it's only about a dollar more so it's def worth it to me.

i think i've finally settled on the color for ruby's high chair.
when i bought it, it was natural wood but i knew i would paint it.


last month i painted it a pale aqua that i had on hand, but it just wasn't doing it for me. 


i went to lowe's and picked up valspar's tropical oasis gloss spray paint.
i think i did 3 light and even coats on a sunny, non-windy day {waiting at least 5 min in between coats}.


i am letting it cure for a couple of days before ruby uses it, but i am so happy with it!
i love the saturated pop of color.
i love the high shine and easy wipeability of the gloss.


now i want to find more things to spray paint!
i feel more confident to try bigger projects now that i know how good valspar is. :)

what about y'all? do you have a favorite brand of spray paint? 


Pin It

Tuesday, February 14, 2012

pillowcase dress tutorial

happy valentine's day, friends!!

since today is the day of luuuuvvvv, i thought i'd show y'all some lovin' and with a tutorial.

so first of all, i know that there are many pillowcase dress tutorials out there.
but i thought i'd go ahead and share my simple, figure-it-out-as-i-go method in case y'all want to try it.
if you are a seamstress or a perfectionist, quit reading now.
this is by no means the right way to do this, this is just my own personal super easy, sara-version. :)
also, this is a super simple dress that you could even do with iron-on hem tape if you don't sew.


i made this sweet little dress for ruby for valentine's day.

i bought 1/2 of a yard of the red dotty fabric from hobby lobby and i already had the ribbon and fabric for the hearts.
i just eye balled how much fabric i'd need by holding it up to ruby in the store.

you can also take a dress that you have that is the right size and gauge your fabric that way.
or google pillowcase dress sizing.

first, i folded my piece of fabric in half width-wise and laid a dress of ruby's down to get an idea for the length of the dress.


next, i decided how long i wanted it to be, and added about 6 inches for seam allowance and the ribbon casing.  then i cut off the excess.


then, i trimmed up the top and bottom edges to make sure they were straight(ish).


next, i lined up the selvages.


i used the full width of the fabric for this dress {half for the front and half for the back} because i wanted it to be full when i gathered it up with the ribbon.

but if you want it more straight and less full, this is where you would trim some fabric from the width.
it does not have to be perfect, this dress is very forgiving.

next, {with the fabric still folded and right sides facing each other} i sewed a straight seam along that selvage edge, being sure not to leave any white edge showing.
i cut off the excess and sewed a zigzag stitch along that edge to keep it from fraying.

then, i folded the bottom edge up 1/4 of an inch {ish} and then up again and pinned it.
i sewed that edge to make the bottom hem.


next, the arm holes.
i folded the fabric in half again width wise.
i looked at my example dress to get an idea of the size for the arm holes.
then i measured across two inches and down four inches.
i made a little snip with my scissors to mark then spot first.


then, i made a curved, j-shaped cut for the armholes {you are cutting through 4 layers of fabric at this point}.
again, this does not have to be perfect.
just give it your best shot. :)


 then, i unfolded the fabric and used some pink grosgrain ribbon that i had on hand to finish the edges of the arm holes.
the ribbon i had was 7/8 inch and i folded it in half over the edge and stitched it in place.


next, i made the ribbon casing.
i folded the top over 1/4 " and then another inch and stitched that down, close to the folded edge.


then, i took some more of that pink ribbon and cut two lengths that were each twice as long as the width of the dress.
i pinned one edge with a safety pin and worked it through the casing.  same with the other one.
then i stitched a little straight stitch in the middle to keep the ribbon from slipping out.


then, i just cinched up the ribbons to gather the top and tied them in bows on each side.
make sense?


to make the dress valentiney, i cut some scrap fabrics into heart shapes and stitched them on.
i left the edges raw because i like the look of the frayed fabric edge.
i purposefully sewed it around and around and kind of wonky. :)


this was a really simple and inexpensive dress to make....and i love how it turned out.

ruby received many compliments on sunday. :)


our little valentine. :)


so i know this tutorial was very basic.
i wanted to make sure even non-sewers could do it. 

let me know if you have any questions.
i'm thinking of making a modified version for me. :)


Today's Creative Blog

Pin It

Monday, October 10, 2011

this could be why i've had so many cavities . . .


i grew up on sweet tea. 
there was a pitcher in our fridge at all times. 
if you live in the south, it's a must have.

it's my beverage of choice, fo sho.

most of you probably have your own way of making tea, but i've had people ask how i make it, so i thought i'd give you a tutorial on my version of southern sweet tea.
if you're a yankee and only drink unsweet tea....well, i'm sorry. come back tomorrow.

here's what you need:


i used to buy luzianne tea, but i started using great value and it tastes great.
so whatever brand you fancy will work.
and i didn't realize until looking at this picture that this is "iced tea brew."
i don't usually use that kind...so really, it doesn't matter.

first, you put a tea bag {or two if you like it stronger} in a measuring cup or microwave safe cup/mug. 
fill it about 3/4 full of water....don't fill it too full or it will bubble over in the micro.


microwave for 3 minutes.

while that's a cookin', put almost a cup of sugar in your pitcher.
more than 3/4 cup and less than a cup.
i just eye ball it. . . about this much:


if i have time i let the tea bag steep for a few more minutes before pouring it in to mix with the sugar.

next you get your tap water running as hot as it will go.
fill the measuring cup back up and let that tea bag steep a little more.


add that to your pitcher.


then fill to 2 quarts with cold water.
stir it up and you're ready to enjoy your fresh brewed sweet tea. 

i like to drink my first cup warm.
my sweet mid-western husband mixes his half with lemonade to make an arnold palmer.
he grew up on unsweet tea so my tea is just too much for him.
more for me. :)


Pin It

Friday, August 19, 2011

baby girl nursery reveal

welcome, welcome to baby girl's room!!
i'm so excited to finally show you her sweet, girly, & very pink room.


her room is ready to go . . .  all we need is our sweet little girl.


i love antique silver.
i picked up this little dish at the thrift store for 75 cents.
i already had the white metal basket & milk glass.


i found the little accordian peg rack at the thrift store {big surprise} for like a quarter.
i see these all. the. time. at thrift stores and yard sales.
it was ugly brown so i just gave it a few quick coats with the same watermelon paint that i used on the chandy
i thought it would be perfect thing for her plethora of headbands


i never throw away or get rid of pillows when i redecorate.
i always save them to be recovered. no need to spend money on pillow forms. 
i have a huge stack now, it's actually getting a little out of control.
i definitely whittled down that stack recovering pillows for the nursery. 


pillows are so fun to make. :)


i made the flower using one of emily's flower tutorials


i've so enjoyed digging through my pile of fabric scraps to see what i could create for her room. 


her curtains are actually a vintage bed covering that i cut in half.
i found it at an antique store months ago and i knew immediately that it would be perfect for curtains.


i am so happy with her room.
no room in my house is ever totally finished . . . i will add or change as time goes by.
but for right now, it's ready for a sweet velvet-skinned baby girl to come home to. :)

if you'd like to read more about the progression of her nursery, i posted about her wall color, her girly chandelier,  recovering the chair, rehabbing the dresser, her wardrobe, her crib skirt, and the embroidery hoop wall art.


Pin It